In the first part of this two-part series, we created a Rule App that calls out to an irServer REST Rule Execution Service (RES) – if you haven’t already, I’d highly recommend reading through that first.
In this part, we’re going to briefly touch on how to configure an Azure App Service with App Service Authentication and Azure AD, and then we’re going to update our Rule App to retrieve an OAuth token from Azure AD to use it in an execution request placed to the execution service protected with App Service Authentication.
Warning: in the InRule Blog, we have a wide variety of posts – some are targeted towards business users, and others are targeted towards the more technical side of our customer base. This post is the second in a two-part series about interacting with REST endpoints from a Rule App, and they are decidedly for the latter audience.
Got another cup of coffee? Let’s go!
Configuring Azure App Services with Azure AD Authentication
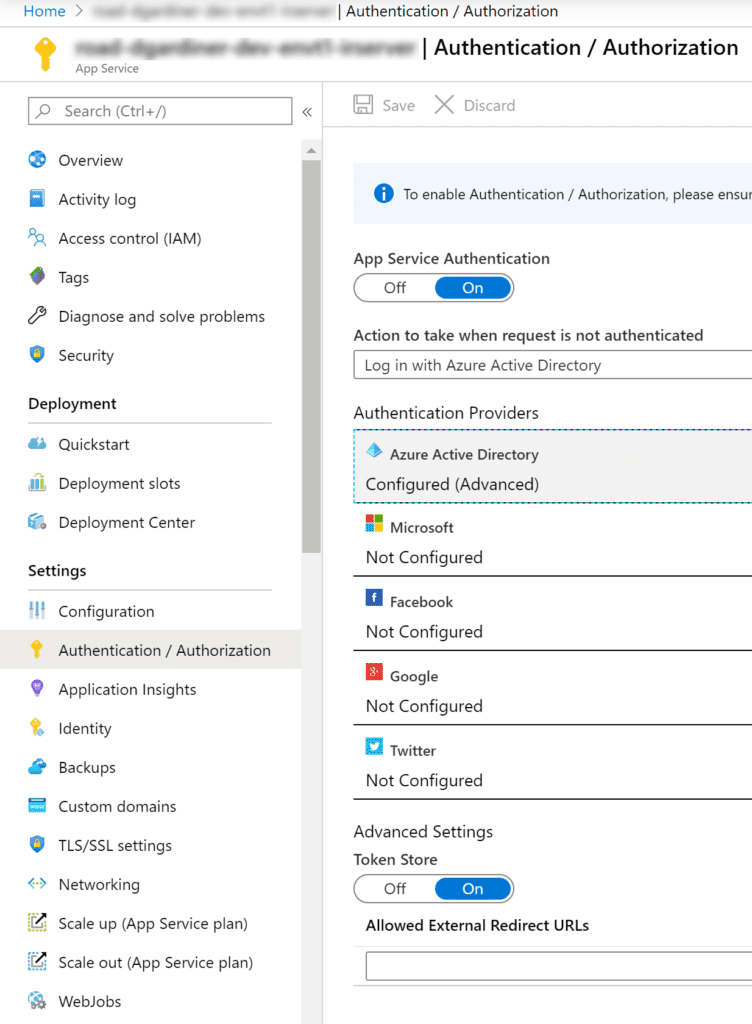
InRule’s standard irServer Rule Execution service is shipped as a generic service, which allows customers to put any kind of authentication on top of it. Our general guidance for the easiest authentication to layer on (when deployed to Azure) is to use Azure App Service Authentication, which is simple to enable on the Azure Portal.
This process is pretty well documented by Microsoft here, so I’ll just touch on the highlights.
1. Turn on App Service Authentication

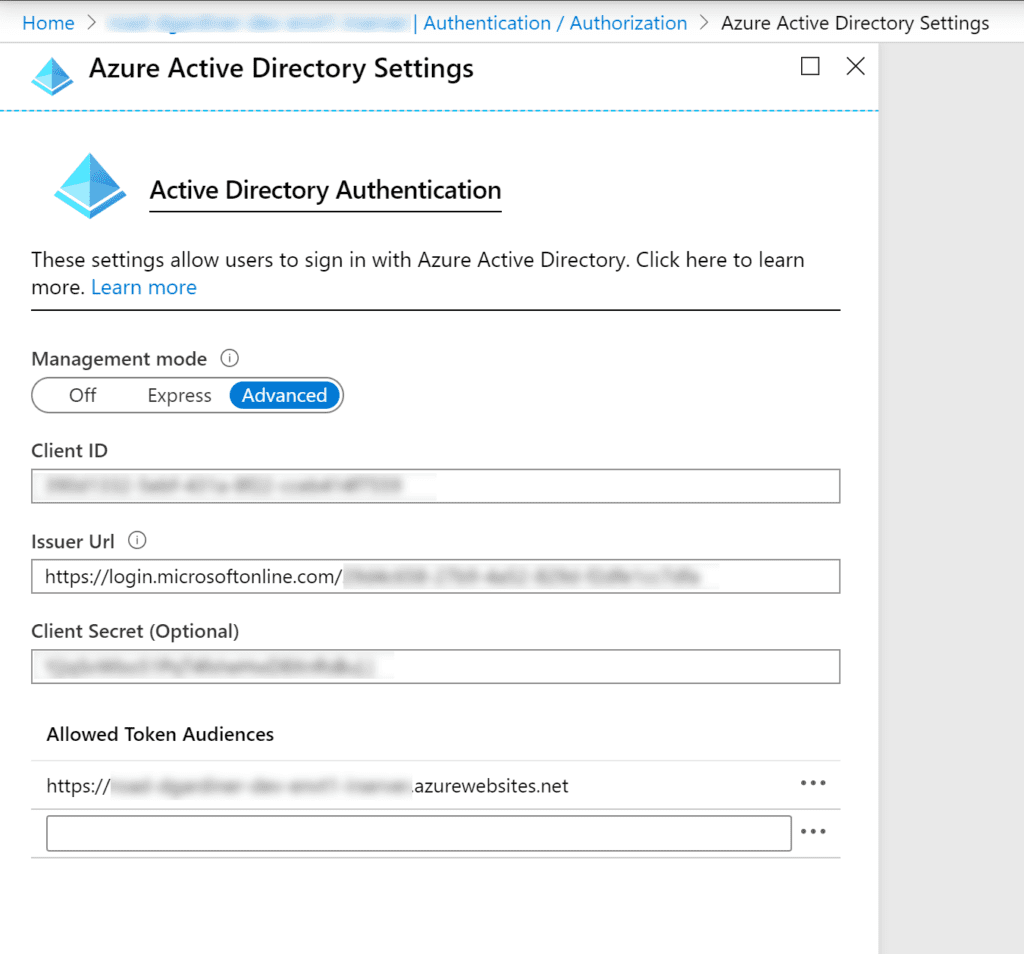
2. Configure Azure Active Directory using an Azure AD App Registration

3. Note the App Registration’s Application ID, Directory ID, and Application ID URI

4. Enable Access Tokens on the App Registration

5. Add a Client Secret (for use in the next section) and make note of it – you will not be able to view the full Secret from the Azure Portal again.

6. Grant the App Registration API Permissions to Azure AD Graph and the RES App Service

Once App Service Authentication is enabled and configured for Azure AD, you’ll need to include either an APIKEY or Bearer token authentication header when placing requests to the RES.
Retrieving and Using an OAuth Token in a Rule App
The final step in our authentication sandwich (and the original reason I started writing this post) is retrieving an OAuth token using a rule app. While in this example I finish by making a request to the RES using the method described in part one of the series, the same process would apply to placing requests to any resource behind OAuth authentication. You can follow along with this example Rule App.
Since getting an OAuth token is fundamentally just another REST request, the structure should look familiar:
1. Define the Response object
We only care about two properties from the response, so it’s a pretty simple entity structure.

2. Define the REST Service Endpoint
This is a generic URL for any Azure AD tenant.

3. Define the REST Data Operation
This is the important bit. All parts of the Request are important here, and the parameter values are what determine the capabilities of the resulting Token. The results of this request can also be cached at the App Domain level – a native functionality of any REST request where the request has the same hash. Be sure that the cache duration configured on the Data operation is less than any potential expiration time on the token, as this structure does not handle token refresh and request retries (although you could build that out if desired).

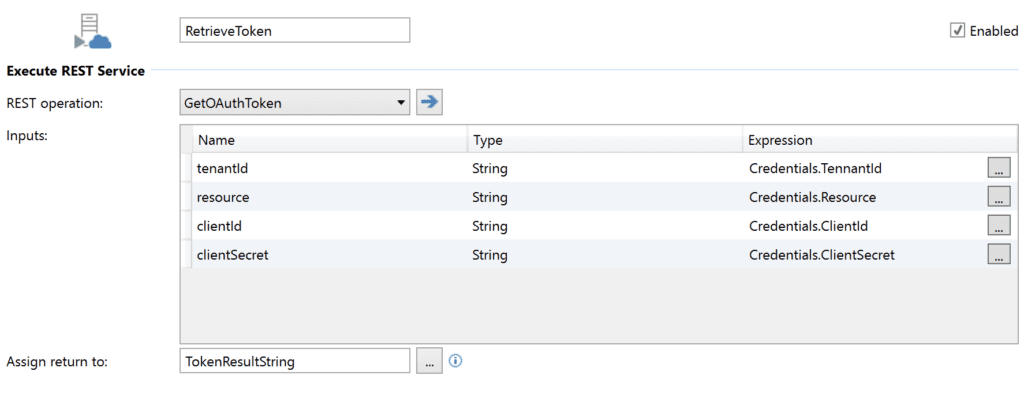
4. Execute the REST Data Operation with appropriate parameter values
Tennant ID (Directory ID), Client ID (Application ID), and Resource (Application ID URI) are all available in the App Registration Overview; the Secret was generated and noted during the App Registration setup. In my example, I’m using an entity for passing around those 4 pieces of information, but that is not required.


5. Map the result into the Response Object
Just like before, we’re going to take the string response and map it to the Response object we defined in step 1 – then, we’re able to get to the bits we need to use in requests.

6. When placing requests, pass in the appropriate “Authorization” header value
The header should be used as “{token_type} {access_token}” – which will look something like “Bearer 000…000”.


…and that’s it! Using that process, you can retrieve a token to be used later in your Rule App to authenticate API requests to protected endpoints.
You can find a rule app with that full process in our Samples Repo; look for the OAuthTokenSample.ruleappx file.
Hopefully this series has been helpful, and has been sufficiently technical without being overwhelming. If you run into issues, don’t hesitate to reach out to our Support team or engage ROAD Services, and we’ll make sure you’re able to implement the functionality your business needs.


