Warning: in the InRule Blog, we have a wide variety of posts – some are targeted towards business users, and others are targeted towards the more technical side of our customer base. This post is the first in a two-part series about interacting with REST endpoints from a Rule App, and they are decidedly for the latter audience.
This series was originally a single post, but after I got past 5 pages, decided it would be better to break it into two parts.
In this first part, we’re going to build a Rule App that places a request to the irServer REST Rule Execution Service (call a rule from a rule?! Crazy, but it does happen on occasion).
In the second part, we’re going to briefly touch on how to configure an Azure App Service with App Service Authentication via Azure AD, and then we’re going to update our Rule App to retrieve an OAuth token from Azure AD to use in an execution request.
Got a fresh cup of coffee? Excellent – let’s begin!
Calling the irServer REST Rule Execution Service (RES) from a Rule App
It may seem counterintuitive to call execute a Rule App from within a Rule App, but we occasionally come across customer scenarios where that does end up making sense. Since the method of calling the RES is very similar to calling any other REST service, this also serves as a great example of how to call any REST service from a Rule App.
- Define the Response objects
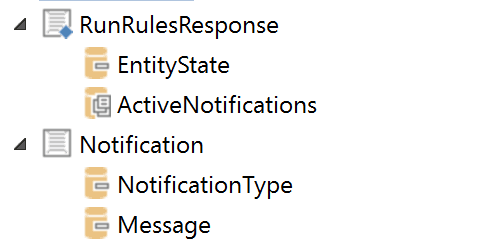
These entities are what the result of Execution is going to be mapped to. Since I’m only interested in getting the bare minimum output from the Rule Engine, I’m only going to include the fields and entities needed for the final Entity State and Notifications; the rest of the JSON in the execution result will be ignored during the mapping.

- Define the Entity State object
This is what we’re going to use both for the initial Entity State (serialized to JSON) as well as what the final Entity State is going to be mapped into, so it should align with the root entity (as well as any children, if needed) as defined in the Rule Application that we’re calling.

- Define the REST Service Endpoint
Pretty straightforward – this endpoint should point to the HttpService.svc we want to hit.

- Define the REST Data Operation
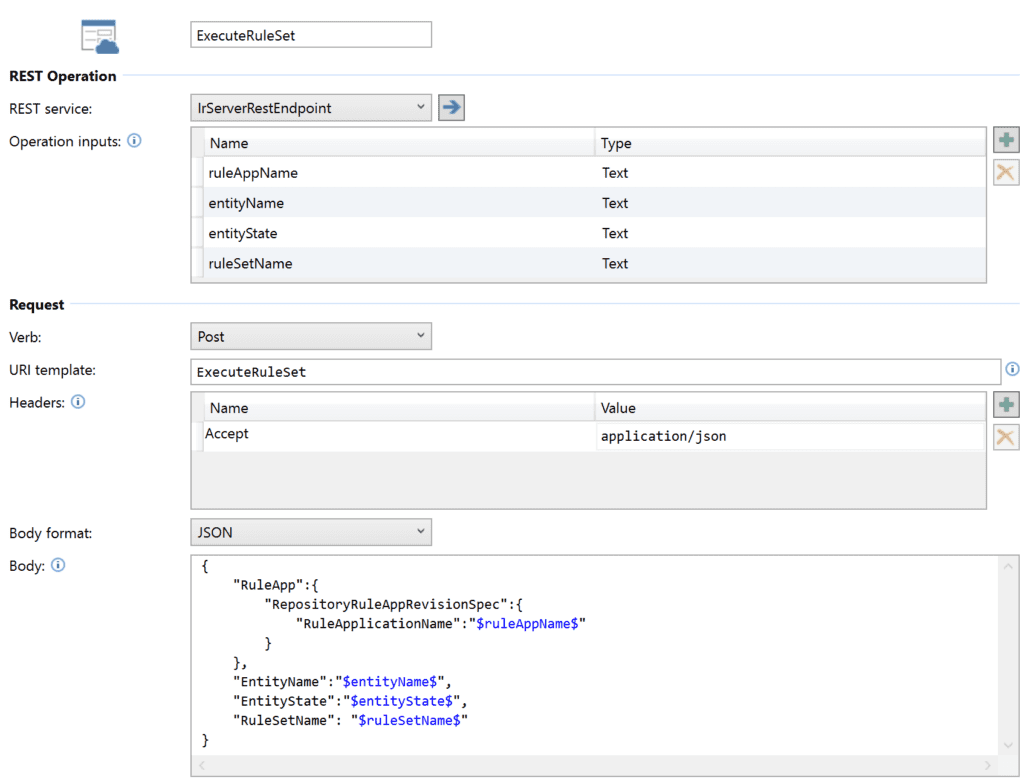
Now we’re getting to the good bit! There are 2 key items here:
-
- The “Accept” header should be “application/json” so that the returned value can be mapped into entities properly.
- The Body should be sent as JSON and conform to the standard RES request structure. In this case, I’ve got all the important bits set as variables that can be passed into the operation for easier reuse. I have an Operation set up for the ApplyRules URI template as well as ExecuteRuleSet – with the latter also including the additional property RuleSetName.
The body populated here is the same as we’d define in any other application placing a request to the RES – as described in this post.

- Execute the REST Data Operation
With the infrastructure bits all set up, it’s time to place the request!
The only “gotcha” in this bit is around the entityState – since we have the object defined in our Rule App (from step 2), we can simply create a variable instance of that and set the initial values prior to execution. Then, we can use the ToJson method to serialize the object into a JSON string – but since our REST request body uses double-quotation marks around the JSON properties, we’ll want to replace the double-quotes in the result of ToJson with single-quotes. If your data may contain single quotes already, consider removing those with another Replace prior to the double-quote replacement.

- Map All the Data
Once we’ve received the string result of execution, we need to perform two Map Data actions – one from the result of the Execute Rest Data operation into a RunRulesResponse variable (defined in step 1), and one from the EntityState of the first mapping into our entity state object (defined in step 2). Once we’ve finished with that, we can grab any Notifications from the first mapping, and our final entity state after Rule Execution from the second one – we’re good to go!

Got all that? It may seem like a lot, but the overall process is relatively straightforward once all the components are in place. Now that we’ve gotten some background on placing this kind of REST request, come back for part 2, where we’ll add authentication into the mix as well!


