I’m a big fan of serverless technology for a variety of reasons. First and foremost, I like only having to pay for what I use versus paying for a machine to sit idle so that it will be there when I need it. I really like how easy it is to use and I especially like that I don’t need to stand up a VM to use it. Most of all though, Serverless really highlights the value proposition from InRule’s JavaScript engine with how seamlessly the two integrate. I’ve previously written about integrating InRule with Amazon’s Lambda functions.
In this post, I will discuss how to leverage Microsoft’s serverless technology, Azure Functions. Microsoft offers a very similar experience to Amazon, allowing you to provide your code in your language of choice, and it takes care of everything else that needs to happen between hitting the service from the outside and your raw code executing in response.
While working on this post, I decided to try out Microsoft’s local development capability for Serverless which lets me get it working on my machine and then publish the functions to the cloud once everything is working. I found a great article here that explained how to develop Azure Functions locally using the Azure Functions Core Tools, which has a Command Line Interface (CLI).
In this post, I’ll first summarize the steps I took to get the sample up and running. Then I’ll get into how to integrate your functions with InRule.
Note: You will need to have NodeJS installed for these instructions to work, as you will use the Node Package Manager (NPM) to install the CLI. Information on installing NodeJS can be found here.
Hello World
Step 1 – Install the CLI for azure functions
The following will install Version 1 of the runtime. Version 2 is in Beta at the time of this writing, so I went with the stable version. Open a Command Prompt and run the following:
npm install -g azure-functions-core-tools
Step 2 – Setup the project
Open a command window and navigate to where you want your functions to be stored. Initializing the project will create a project folder. Beneath this folder, each function will be stored in a sub-folder of this directory. The initialize only takes one parameter, the project name, which I called InRuleAzureFunctions. Once you have navigated to your storage folder, run the following to create the project folder:
func init InRuleAzureFunctions
Step 3 – Create your first function
In the command prompt, navigate to the project folder to create your function. To create a function, there are 3 parameters:
- The language I want the code to be written in: Javascript
- The template (a.k.a. function type): HttpTrigger
- The name of your function: CalcMortgage
There are other templates to choose from (e.g. queue based, IOT, timer based, etc.). In this case, I wanted to respond to an HTTP request, so I used an HttpTrigger template.
In your project folder, run the following in the command line:
func new –language JavaScript –template HttpTrigger –name CalcMortgage
When the command completes, it will stub out a “Hello World” application. The intent is to have something working that you can then modify to suit your needs. By default, the function will accept a GET and if you pass in a “name” in the query string, it will respond with “Hello {name}”.
To run the function, the hosting service must be running. To start it, run the following in the command prompt:
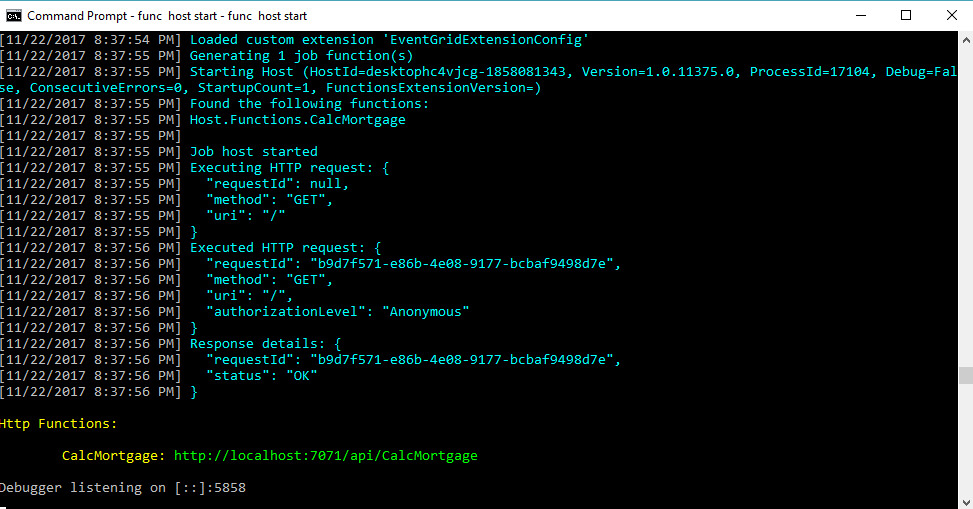
func host start
A response is displayed in the Command Window as the host starts. At the end of the response, you will see the URI of the service.

If you open a browser and paste in http://localhost:7071/api/CalcMortgage?name=Dan, you will get a response that says “Hello Dan”.
Integrating InRule
Now let’s look at what we need to do to integrate InRule. The first thing we need to do is change the function to accept a POST, by default (as shown above) it accepts a GET. To do this, open the function.json file which holds the function configuration and is located in the function folder. Go to the “bindings” section and add the highlighted “methods” line. See below:

The function will now accept a POST.
Now we can modify the function to run rules. We’ll start by pulling in the JavaScript rules. The easiest way to get the rules is to use the InRule for JavaScript extension inside irAuthor (our rule authoring tool). (This is out of the scope of this post, but if you have InRule for JavaScript, there is information in the help file on doing this.) This will package the rules that you have open in irAuthor and convert the rules into executable JavaScript, prompting you to save the rules as a JavaScript file. Save the file to the directory where your function resides. I named mine rules.js.
Now open the index.js file, which is also in the function folder. The code in this file contains the JavaScript function that will run when the Azure Function is invoked. For the mortgage rules, we are going to accept a JSON string in the POST which contains loan information. Then we’ll use InRule SDK code to pass this data into the rule engine and apply the rules. Finally, we’ll return the results, which will contain the monthly payment and total cost of the loan.
Below is the final version of what the file should look like. See the comments for details.

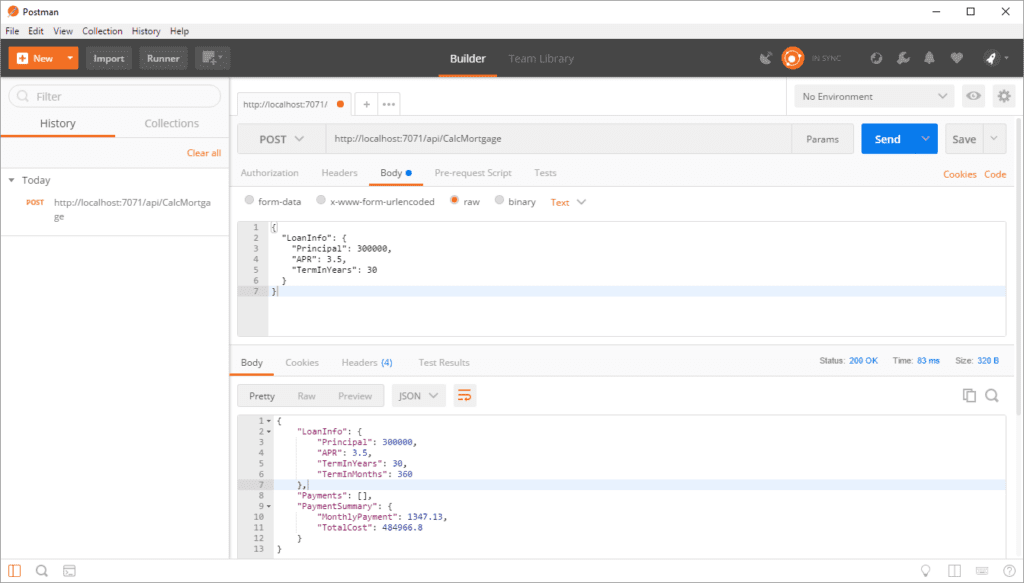
To test, we need to fire up the service in the same way we did above (func host start) and make a POST providing the data we want to use. I used Postman for this (https://www.getpostman.com/), but you can use your service tester of choice. Below is a screenshot of Postman calling the Azure Function as a service. I’m passing in a mortgage, which contains the loan information mentioned above, and getting the updated mortgage back out. Note: In this sample, I’m returning the entire mortgage object, however, you can specify exactly what you want returned by changing what is returned in the body. If, for example, you just wanted the monthly payment, you could specify mortgage.PaymentSummary.MonthlyPayment in the body and you would only get a number back instead of the whole object as seen below.

Publishing
Once we’re happy with our rules, we can publish the function to Azure. Before publishing our function, we need to create a Function App through the Azure portal. Details on this process can be found here. Make note of the name of the Function App, as we will use it to publish the function. In this sample, I called my Function App MortgageFunctionApp.
When the app is finished deploying in the portal, navigate to the function folder (on your machine) that you want to publish and execute the following command. You will be prompted to log into your Azure account if you are not already logged in.
func azure functionapp publish MortgageFunctionApp
When this completes, we can test the function in Azure. You need to go into Postman and update the URL to point to the new function in Azure. To get the URL, go to the function in the Azure Portal. It may take a minute for the function to appear in the portal. When it does, click on the function and you will see an option to “Get Function URL” in the upper right (see below). Click on this and copy the URL.

Paste the URL into Postman and execute the POST again. You should get the same answer we did when testing locally. That’s it, you now have a fully operational serverless service in Azure running rules.
If you have any questions, please feel free to email me directly at [email protected]. Happy coding!


